Thursday, 8 December 2011

Pan pastels with Lin Brown

Another class with Lin Brown and the best thing about this class (apart from Lin's teaching) was we got to play rather than follow a project.

These are two of my favourite tags created using stencils, versamark and pan pastels as well as a stamp or two.

Creating backgrounds with stencils, torn paper and versamark
A close up showing versamark with pastels over the top
I just need to find the time to have another play with them.  I really want to use them on my art journal but I've made some backgrounds which I'm scared to cover!! 
I love the bottle stamp, but it's on a steampunk plate and if you've been following my blog I don't do steampunk!!

Debz
x

Thursday, 1 December 2011

With all my heart

I love recycling things and when I went to a car boot sale back in the summer I found these heart shaped note holders that were crying out for a different spin.

I created a little metal shaped heart for the inset, covered the outside with Ferro and then dry brushed it to give a further dimension to it.  When all that was dry I painted the inset and then filled it with glossy accents to protect the metal.


Before and after

A close up showing the dry brushing
(shades of green highlighted with silver)
Now I just need to work out what to do with the other note holder!

Debz
x

Tuesday, 29 November 2011

Wren and Rascal, Axe Valley Farm

If you are ever in Dorset and find yourself with a spare afternoon I can heartily recommend a visit to Axe Valley Bird and Animal Park, Axminster, Dorset.  Buy the book they are selling and learn how the place came to life - it's a great story.  It grew from nothing with love and affection from people who really care about animals and birds. 


Wren and Rascal existed before THE meerkats and simples!  They were abandoned and bought up on an Aga in the home of the owners of the park.  I stood watching these little guys for about half an hour trying to remember to take photo's, but more often than not just watching them.  Adorable!

There are 6 photo's on this layout


Four hidden behind the front ones and with room for journalling
Isn't it great when you find something stunning to photograph.

Debz
x

Thursday, 24 November 2011

I DON'T DO STEAMPUNK!!

Except apparently I do.  I'm still not going to get into the whole steam punk stamp thing as I just don't get them but I do love the dirty effect as I call it.

At Artsy Craft this year the Sunday project was all about steam punk and I was dreading it.  Just shows what great teacher's Lin and Leandra are, as I was won over by the paint technique and making things all dirty.

I felt like I was recreating a part of my dad's workshop and it reminded me of helping him stock take, the smells and the oil over the floor!

Here's some pictures of what I created alongside a close up of the paint effect.


oops the right hand side wasn't suppose to be hovering, but it became unstuck
and I wasn't concentrating when I stuck it back on!

A close up of the paint work - I love this effect!


My little bottle cap clock
 Surprisingly fun to do and I would definitely use the techniques again but I'm still not sure if steam punk is for me.

Debz
x

Tuesday, 22 November 2011

A little bird told me.....

.... there was a bigger and scarier looking bird around the corner.  I like to think he was looking after his Mrs!  This is my first successful photo through a cage - normally I can't get the focus to ignore the metal.  I'm still not sure how it works but the photo looks stunning without the cage - modest (?!)

I've kept the layout quite simple as the paper is very busy and the photo needs to be centre piece.


Debz
x

Thursday, 17 November 2011

Books, books. books

and not an altered one in sight!

I've been struggling to find time to spend time in my craft room without feeling guilty about housework, ironing and those other boring tasks.  Solution:  book classes and once they're paid for you have to go (and if you aren't in the house you can't see the chores need doing!!)

What is it they say about buses? When one comes they all come at once, well in October I had Artsy Craft, followed by a weekend of two classes at LB Crafts with Lin Brown.  My last class in her little shop, but she has promised to keep on teaching and I've been doing my best to persuade her that the Craft Barn would be a lovely place to start!

I'm always looking for interesting ideas for displaying my photo's and in this class we made three little books which would be perfect for a photo story.  The first little book was a fairly standard book held together with a ring clasp, the second a house shaped book and the third little book reminds me of children's picture books (without the chew marks!)  The best bit about the last book is that when you look at it you wouldn't realise it was so simple (well I didn't anyway!)  The book on the right in the picture below is covered in crumpled foil and then coloured with alcohol inks.  A great technique but the colours I used are a bit bright!


A menage of books

Close of up the simplest book, but it works perfectly
Close up of the house shaped book

Can't wait to create some of these books to use for my scrap booking and I loved it so much I might start making them for friends.  They might need to be a bit bigger though!  I'm addicted to 4x6 photo's.

Debz
x

Tuesday, 15 November 2011

Tracing my ancestors

I've been tracing my family tree for a few years now with the help of my Aunties.  When I first started tracing my family I was under the impression that we were from the West Country and a lot of us are.  What I didn't realise when I moved to Reading was that I was moving closer to the birth place of my grandfather and his family in Oxfordshire. 

Going further back to my Great Grandfather twice removed I discovered he ran the Swan Inn at Bampton, Oxfordshire.  I decided that whilst I was up in Oxfordshire I should take myself on a family history tour to find the Swan and have a swift half where my ancestors had trodden.  Well, maybe a coke, as I'm not a beer or lager girl and I'd be driving!  Unfortunately like a lot of village pubs it's become a house, but the placque was still there so I took a sneaky photo or two (the owners weren't in, I did knock first!!)

Shimelle Laine has made me fall in love with ways of using one scrapbook layout with a number of photos on through her Two Peas in a Bucket class.  I find it a personal challenge to see if I can work out a different way of getting as many photo's on as possible.  So far I'm up to 8, but I'll show you that one another day.  This one has four photos on it and a journal spot. 


The Swan Inn, an ancestral home

More photo's of the gorgeous stream

Hidden journalling


Rub ons used to add extra dimension
 I love this layout, mostly as it's about my family and where we've come from.  It's just a pity I couldn't drink in my ancestor's pub!

Debz
x

Friday, 11 November 2011

Artsycraft Oct 2011

It's that time of year again when I buy myself a birthday treat of a weekend of craft.  I love going to Artsycraft playing with paint and metal. It's about the only time when I can dedicate some serious time to being creative.

This time there were only about 20 people so it was quiet, but still just as great.  We did two projects, the first a bird box which I did in purple which included lots of metal work and the second was a steampunk project.  That's for another day when I've finished it!

Here are the finished birdhouse.

Front: distressed metal work

Back: Faux panels

Sides: moulds + metal

Close up of front


Yummy flowers with even yummier material buttons


Debz
x

Sunday, 30 October 2011

Scrapagogo

One of the Scrapagogo DT team recently asked for guinea pigs (aka volunteers) to have a chat for the blog. I thought loads of people would jump at the chance but it must have been a slow week on the forum and I was one of only a handful of volunteers.

Nic, asked me me what made me start scrapbooking, what I like to do LO's (layouts) about and to show some of my favourite LO's.  Now that it's been shown on the blog I thought I'd share them with you.

The first is of Railay, Krabi in Thailand. Thailand is my all time favourite destination so any layout that shows anything about my holidays in Thailand bring an instant smile to my face.


The second layout was of one of my ginger monsters. Look how handsome he is, how could you resist!


And the final, was of Casa Battlo, Barcelona.  Fabulous house in a fabulous city.  It can be found here along with my chat with Nic.

Deb
x


Sunday, 23 October 2011

Junk, junk, junk

I keep everything and I mean everything.  There's no wonder I can't get into my craft room half the time!  One of my latest projects involved taking one of those boxes you get the flowers in - don't ask me the name as I'd be a hopeless promoter.

For ages it sat there covered in tissue tape, gesso'd and inked, until one day I popped into accessorize and discovered these necklaces on sale - very industrial.  Some might even say steampunky but I don't do steampunk (I can see some of my crafty friends rolling their eyes as I type!)  Once the necklace was attached I had a spark of inspiration, grabbed some Stampbord, my trusty Tinkerbella inks (hope they still do these as I'd be lost without them!) and a PaperArtsy stamp.

Here's to my steampunk flower!


I had thought of putting a clock on the stampbord and creating a fake pendulum, but I like the stamp too much!

Hope you like it
x

Sunday, 16 October 2011

Better late than never

I did a class with Andy Skinner at the Craft Barn back in September (I think) and I've been meaning to blog about it ever since!  I find him inspirational as I'm a technique junkie and Andy specialises in messing with paint and textures.  He works on ceramics a lot and loves working with paints and textures.  I'd never considered what could be done with ceramics , but as I love working with paint I thought this would be an ideal class for me. 

We did some test pieces where we learnt how to create a rust paint effect and then how to use moulding paste.  Moulding paste is a great product as you can get great depth using it.  In the afternoon we all decorated a ceramic box however we wanted.

A really fun day and I met some great crafters.  Can't wait to do Andy's next class in November.

Here's some pictures:


Ceramic tile covered in moulding paste, stamped into and painted

Top of ceramic box covered in gesso and dry brushed

Side of box showing fake rivets

Thanks for looking
Deb
x

Wednesday, 6 July 2011

Summer days - huh!

Just to remind you of sunnier times I have created my own little beach scene. The stamps used are from Crafty Individuals and the paints from PaperArtsy.

I picked up a rather tired and dull looking picture frame from my local car boot sale with beach huts painted in really bright colours and set about making it a little more vintage complete with sand on the base.  I knew those shells and star fish would have use one day!!!


Click to enlarge

Hope you like it
Debz
x

Wednesday, 27 April 2011

Ghosting Techniques with Chris Dark


click to enlarge
I recently attended a Chris Dark workshop at the Craft Barn to learn all about ghosting techniques.  It turned out I knew some of them already but hadn't ever played with them.  We were supposed to be making cards at the end but we were too busy taking the michael (Zummerzet saying I think) out of each other so Chris let us carry on playing.


click to enlarge

Since coming home I've been meaning to play some more but that would mean plugging my iron in and I'm being a lazy mare at the mo so it hasn't happened.  Of course I could play without the iron but I'm obviously being too lazy to reach for the Perfect Medium too!

Here are some of the bits that I produced at the workshop and hopefully I'll be along with a masterpiece soon.

Thanks for stopping by
Hope you like them
x

Click to enlarge

Monday, 25 April 2011

Oh boy oh boy

There are two things that I am absolutely hopeless at and they are cute and men's cards.  I'm not saying I'm fabulous at everything else at life as who is and wouldn't that be boring, but cute and men's cards, we do not mix.

Click to enlarge
On that basis I'm going to challenge myself to make both cute and men's cards.  Not together as that would be way too stressful and it is summery outside, meaning I want to leave my craft room before winter sets in!

So as not to stress myself out too much on this journey into the dark unknown I came up with a plan to make a travel card.  Ok, I know, it's not really a man's card as such, but it would "do" as a man's card, wouldn't it?  Little steps an' all that.  So I got out some stamp stamps and stamped away creating this. 

Hope you like it
x

Saturday, 23 April 2011

Craft Stamper

This was my entry to craft stamper's stamper of the year competition 2010 (yes, I know yonks a go - I'm a bit slow!)  I found this picture frame in Home Sense in the about to be sent to the rubbish bin section!  After taking off the back and giving it a lick of paint or two it looks like new.  Don't know about the rest of you but I think we send things to the rubbish bin way to quickly these days.  I'm making my mission this year to recycle more in my crafty ways (watch out on Grime Busters as my house appears full of toilet rolls, plastic and other such lovelies saved up and never used!)

I love playing with metal and utee so I wanted to make something bold, in two of my favourite colours (deep pink and aqua).  The image in my head was of a picture come to life so I wanted eveything to be bursting from the frame - not sure I really achieved that, but when I put on too many flowers it started to look messy.  Oh well, never said I was the finished article - crafter in training more like! 

First stop to make a mould using Tim Holtz bird cage alteration die.  It took a while to perfect the mould and then even longer to pour just enough utee to avoid going over the top of the mould.  It might look like its been damaged in places but that's on purpose - didn't want it to look to perfect and I wanted the bird escaping!  I've used Terra and Inka Gold to give the frame a rough look.  I wish I'd done something a little different for the bird, but I love the shrink plastic leaves on the branch and the ickle moth.
click to enlarge
The flowers are a mixture of PaperArtsy die cuts either embossed, alcohol inked, stamped or a bit of everything!  Some of the flowers have then been cut to make them different, either cutting out bits or raising them. One of the flowers is a bit mashed up but it has been to Malvern and back!

I'm entering this into:

Stamp Something - flowers, buttons and sparkle
Fabulous Friday - birds or butterflies

Hope you like it
x

Friday, 22 April 2011

In love with alcohol

inks that is, although I may be partial to a drop of vodka every now and then!

Hel's at Ink on my Fingers has challenged everyone to is all about Lurrrve - things you love and over at Simon Says Stamp and Show the theme this week is a Lord Tim of Holtz technique.  I've combined the challenges cos Lord Tim of Holtz techniques is what I love, although I'm also partial to a Paperartsy stamp of two.  Don't worry they got a look in too!

I've created a card cos I'm back in the mood for cards.  Thank goodness was starting to get a tad low and thinking about a trip to Clinton's (yes, I know I'm a bad person stop screaming at me!)

Anyway the card uses an alcohol background, some PaperArtsy stamps and some of my favourite ink colours.  Obviously there had to be a bit of Lord Tim of Holz bling on it too.


Hope you like it
x

Wednesday, 20 April 2011

Sammy and babies

Hands up, there is very little stamping on this.  In fact the only stamping is the paw print which I used to frame Sammy and her four beautiful babies.  I had to show you it though, mainly for the photo.  How can you resist a beautiful black puddy cat and her four beautiful cute black babies.


They are now about 4 weeks old, growing fast and looking even more beautiful.  Sammy is getting a tad jealous of all the attention they receive though so has taken to providing a friendly nip to act as a reminder that she is still gorgeous too!

Hope you like it
x

Sunday, 17 April 2011

An ode to PaperArtsy and Lin Brown

Much to Mr Bank Manager's relief and much to my annoyance (not really, well yes really, but I was being a good girl - all grown up - eek!) I didn't get to Ally Pally this month.  Luckily for me a friend did and whilst crafting away with her yesterday she divulged this little secret and promptly produced a tag created for her by Lin of LB Crafts. I was shocked, not only because she wasn't going but also because she had persuaded Lin to go PINK - eek! Rather annoyingly even a tag made with Lin's least favourite colour was gorgeous. 


Anyway, Ruth had, after receiving her masterpiece promptly picked up half the shop (actually she was quite well behaved and only bought half a dozen of the Al Fresco paints by PaperArtsy).  As Ruth had been cheeky enough to go to Ally Pally without moi I insisted (sort of. it went pretty pretty please could we play with your new paints) we made a tag, an ode to the tag she had been given when she wasn't with me (not that I am at all PUT OUT!) I got to use the lovely Al Fresco paints which I fell in love with at the AC event in Feb and rather smugly I could sit there knowing I had been all good and virtuous (ok, that's stretchy the matter!)

This is the tag I created using a Hero Arts Old French Writing stamp, some tissue tape  and some PaperArtsy stamps, as well as the afore mentioned paints.  I'm possibly not able to be quite as smug today as I may have just put in an order for some paint at PA HQ, but hey I was still environmentally friendly!

And as Simon Says Stamp and Show is all about distress this week I thought I would enter my tag.  Made with distress inks and those flowers certainly look stressed or did I mean distressed!

Hope you like it
x

Thursday, 14 April 2011

Butterflies

For some unknown reason I have taken to Butterflies in a big way.  Maybe it's the arrival of the summery weather (well it did arrive and now it seems to have gone again).  or to cheer myself up.  I'm cursed I tell you, first the car crash, then my mum's car crash, followed by the shower pump and this morning a leaking ceiling.  This can only mean I'm going to have a fan dabba dozy summer and I'm planning on picking up the winning lottery ticket this weekend!

So back to the butterflies.  In an attempt to use up some of my scraps of patterned paper I've made a couple of cheery cards using a Crafty Individuals stamp (CI 296, if you're interested). 

I wanted them to be fairly simple as the stamp is gorgeous so I covered a couple of square cards in the most gorgeous paper which I think is Crate Paper and I have no idea what the name is.  I love the combination of pink and orange, it's such a cheerful grouping. 


Click on the image for a larger version
I'm entering the cards into the Crafty Individual's challenge which is squares.  I hope I'm not being cheeky using square cards, but I just had to use the oblong image!

Hope you like them
x

Friday, 1 April 2011

This was supposed to be my entry to Simon Says Stamp and Show, but blogger decided otherwise.  It started life as a peanut tin - you know the huge ones you get at Christmas.

I was a bit worried that you'd still be able to see the words on the tin as the tissue tape I used to cover it is quite translucent. Good job I've got a truck load of this as I seem to be using it on everything. Watch out cats!

After a dab of paint and pear tart memento ink (tsukineko), a splodge or two of Inka Gold lava green it was looking a bit more presentable. I then stamped on tissue using a Crafty Individuals stamp borrowed from a friend, Lucy (check out her blog, lovely things to see on it) and Tim's film strip stamp. All images were applied with Claudine Helmuth's matt medium which is just the best stuff ever.

My word for the challenge is tools as this is what the tin is for. Couldn't resist a bit more bling so I stuck on a Tim Holtz wordy thing (that's a techy term in case you're wondering) and then I got completely carried away with gems. Still have these from a TSV I bought on QVC about 5 years ago - this is why I don't buy on there anymore! Actually it's also because I like to support small shops too whether on the internet or locally {jumping off soap box}.

Anyways hope you like my new tool tin. The picture isn't the best. Not sure if its the light I took it in but the tissue is much more blended in than it appears - weird!

One final thing before I disappear I've been getting lots of lovely comments recently especially about my little flood. Thanks so much I really appreciate them and will try to visit your blogs when I have a moment.

Hope you like it
Debz
x

Sunday, 20 March 2011

A quickie tonight

Wow where does time go?

Last week my shower pump leaked and flooded half of downstairs.  That was fun - a week of cleaning up and trying to dry stuff out.  At least the insurance are happy to pay out, not that I've had time to get any quotes.  This week, I'm not really sure what happened, physio and work I think.  How boring!!

Anyway this was supposed to be quick so here's a photo of my entry into Simon Says Stamp and Show this week where the theme is stars.

The frame is tissue taped thanks to the fab Tim Holtz.  I then Gesso's, distress stained and used snow cap dabber to stamp the Tim Holtz star.  The inside of the frame is lined with some beads which I coloured with alcohol ink.  A bit of metal embossing and a PaperArtsy stamp later, Voila.


Hope you like
Debz
xx

Friday, 4 March 2011

4 x 6 Photo Love

As a photographer (in the losiest sense of the word) I think its too easy to snap away these days as we nearly all have digital camera's.  How many of us actually print the pictures?  If you do print them, how often do you look at them?  Most people can probably answer No to the first without moving on.

I'm a scrapbooker which means I should be printing my photo's all the time and looking at the fairly regularly, but sometimes everyday life gets in the way.  I have several time consuming hobbies, altered art, rubber stamping, scrapbooking and researching my family tree, as well as attempting to improve my photographic skills.  I dip in and out of them, but sometimes I realise that I dip out of some of them too much and I could combine them.

That's what I'm doing this year.  Two Peas in a Bucket are doing a number of online classes this year so I've signed up to keep myself up to date with my scrapbooking which also means I have to take photo's regularly.  On top of that I'm going to try to put some sort of inking, rubber stamping or paint on the majority of my layouts.  Let's see how it works out.

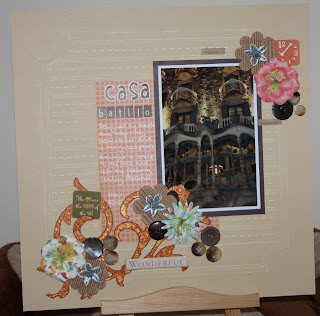
This layout was inspired by Shimelle Laine's 4 x 6 Photo Love class in January 2011.  The swirl is inked with Distress Inks and sprayed with glimmer mist.


Click for a larger image

The picture is of the outside of Casa Battllo in Barcelona, Spain.  Designed by Gaudi, it's a seriously impressive building inside and out despite the fact that it looks like there are bones supporting the structure.  If you happen to find yourself in Barcelona don't leave before you have visited.  I'd given anything to live in such an inspiring space.

Hope you like it

Debz
x

Wednesday, 2 March 2011

Oh La La

Okay so originality in my writing is not my strong point!

Popping in to see Hel's at Ink on my Fingers I discovered her theme this week was Paris so I set about making a Paris themed tag with some lovely new stamps.  Whilst waiting for the background to dry I discovered the theme over at Simon Says Stamp and Show  is Ephemera.  Great as my tag was already going to incorporate my lovely new Tim Holtz stamps which I got at the ArtsyCraft event he did recently (did I mention that already?  Slipped my mind, nah that's such a lie.  Slipped my mind, as if).  The label I used was from his travel labels CMS108 set.  Love these already. 

But before I stamped I should probably tell you about the base.  I sprayed the tag with Adirondack color wash (sunset orange and butterscotch),  dried it and then rag rolled it (not sure if that's a technical term or not) with Distress ink in walnut stain.

Finally I stamped a paris scheme which consisted of an Eiffel Tower stamp from Hero Arts and a B Line Designs stamp called The View.  I set this slightly off the page and then restamped some of it slightly lower as the tag was too long.  Don't look to close at the Eiffel Tower as it seems to be sat on a house!

Finally Finally I sprayed it with Crafty Notions white Matte and blended it in before finishing off with a few drips on the same spray and Perfect Pearls heirloom gold.  Think I might have to get a bottle of that white matte in reserve as I'm not sure what I would do if it ran out.  I seem to use it on everything lately.

Anyhows, here's my finished tag


click for a larger image

Hope you like it

Debz
x

Tuesday, 1 March 2011

An Ode to Tim Holtz


As promised my homage to all things Tim Holtz.

To those of you who follow me just because you like my work (rather than being a crafty person), Tim Holtz is massive in the craft world.  He works with Ranger showing us amazing ways with new products and inspires people all other the world.


Click on any of the pictures for a larger image
The class he bought to us was called Configuration of the Imagination.  I love altered art, but mostly because I get to play with rubber stamps, inks and paints in a big way.  I was a little worried about this class when I saw what we were doing as there wasn't a lot of painting or inking ... was I going to enjoy it?

Those Tim Holtz stalkers out there are probably balking at the fact that I have even dared to think I wasn't going to enjoy a Tim Holtz class.

But that's where I showed my ignorance.  What Tim did was give us 4 hours of inspiration.  Two hours to do the boring stuff and further 2 hours to fill the box with the goodies we were given and anything we had bought along.  With music in the background (he's got great taste in music btw) he allowed my imagination to get carried away, playing around with placement of items and changing what I had into something a little different.

It's hard to see from the finished product but it starts off as a fairly plain box with all these litle boxes you can move around before covering with paper, in our case, inking and painting.

The large glass vial we were given was fantastic but it would have been way too easy to use it as a glass vial, so I didn't. Instead I used Ranger matte medium to stick pearls to the bottom, added some seed beads at home and then wrapped the film stip and ticket inside it. The matte medium is taking forever to dry but when it does the pearls should look suspended. If you look carefully the lower ones already do.


None of the flowers I was given went into the box without being cut up and changed into smaller or wilder looking flowers.  The corks in my bottles had a habit of being grouped with something else (one is supporting the soda cap at the top, and one I stuck in to look as if it's support the cotton reel with flowers).

As I was filling my box I realised I had so many wonderful things at home I could add so when I got home I filled one of the bottles with mico beeds, added some shells, a metal crown, a stamped peice and a couple of badges I've had for years.

Anyway, morale of this story never judge a book by its cover (or class instructions, in this case).  I REALLY enjoyed this class and can't wait to do another.  I'd love to do some of Tim's inkier classes so maybe a trip to the States is in order.  I don't want to become a stalker (that position is already taken, anyway), but maybe a Holtz cruise is in order.

Hope you like it

Debz
x

Sunday, 27 February 2011

Wow, wow and more wow

Had a fab day yesterday at the Artsy Craft event featuring the fantastic Lin of LB Crafts, the wonderful Mrs PaperArtsy Leandra and the fandabadozy Mr Tim Holtz .... and the winner was .....

ME!

First off was a bit of shopping, well quite a lot actually (but I was £3.96 under budget, so well done me).  Then it was on to Lin and Leandra's class and finally Tim's class in the afternoon.  I was equally excited about both classes as Lin and Leandra never fail to come up with an amazing project and the classes are always such fun.

This is Treehouse we made, which some of my table threatened to steal.  I'll take that as a complement!


The next pictures show some close ups.  The first one of the metal tree which was debossed, painted with Paper Artsy's new paint range (which is fab) and then sprayed with Ranger Adirondack Color Wash (their spelling not mine!)

The background is the Paper Artsy Thorden Hall papers which are equally fantastic.  This was painted with a mixture of the color wash and paint so as to give a misty background effect. The stamp is one of the Paper Artsy Hot Picks.

It's hard to believe that frame also started off a deep maroon colour.  I inked and splodged it so that it has a lovely mint green colour.  It's a shame the picture doesn't show the texture.


And finally a close up of the doors.  The paper underneath is a deep maroon colour so it shows what good coverage the paint and color wash mix gives.  Forgot to mention that the paints have a matte finish which is ideal for stamping on and they are even suitable for outside painting.  Although they only come in small bottles so probably not for painting walls!

I'm going to post my homage to Tim Holtz tomorrow as I'm waiting for something to dry clear.  At the moment it looks super cack, but hopefully it will look slightly more interesting once dry!  Glad I waited until I got home to finish it off as the items I've added from my own stash make it personal and more special (if that's possible as it is signed by Mr Holtz himself).

Hope you like it

Debz
x

Saturday, 19 February 2011

Messy inker

Grrrr, started to make a tag blending but back is too painful tonight.  Instead I got out my glimmer mists and crafty notion sprays.  I'm now successfully covered in black, white, green and blue spray and I've almost melted two of my Tim masks, oops!

I started off by lightly spraying the tag with black matte Crafty Notions spray before adhering Tim's swirl mask. I then spritzed it with more black, dried it and spritz it with white matte Crafty Notions spray.  Once dry I used jazz blue and meadow green and dabbed it with a tissue before dripping more white spray on the tag.

Having left overnight to properly dry I stamped images from PaperArtsy's Ding Dong 2 & 8 plates in Black Soot Distress Ink.  I'm going to use it for a scrapbook page I'm working on, so watch this space for its final destination.

Hope you like

Debz
x